Create a Success Plan
Available Success Plans
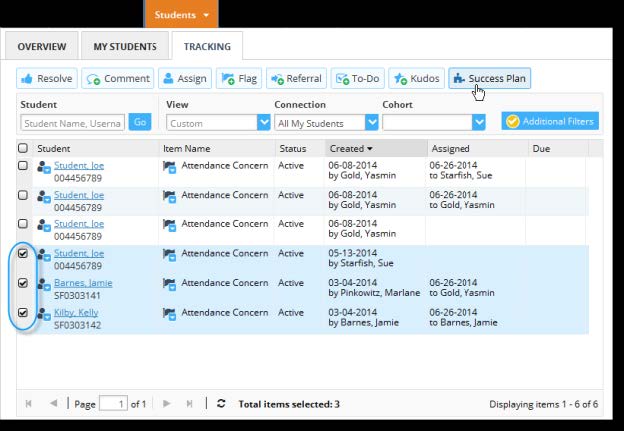
If your Starfish administrator has created any Success Plan types that you have access to, you will be able to assign a Success Plan to one or more students using the Success Plan option from the action bar on either the My Students or Tracking sub-tab within the Students tab.
Success Plans can also be created from the action bar within an individual student's folder. Existing plans are displayed on the Plans tab of the Student Folder.
Create the Plan
- Select the desired student (or students) and click the Success Plan button from the action bar. You may select up to 750 students at a time.
- Select the desired Plan Type from the drop down list presented. The Success Plans you have access to for the selected
student will be included in the list.
Once you have selected a choice, the default set of information and tracking items for the plan will be filled in on the page.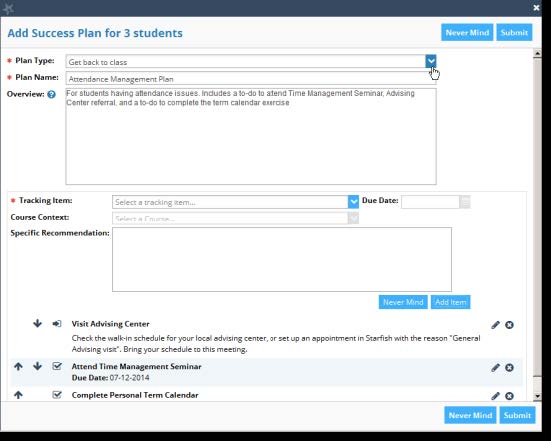
- Update the Plan Name if necessary. The default Plan Name will be included, but you have the option to customize the plan name for the selected student(s). For example, you can personalize the plan for the student by adding the term ID or student's name to the default plan name.
- Update the Overview. The overview provides general information about the plan and will be visible to anyone who has access to the plan. It will also appear on the printable version of the plan. The default overview is included, but you can customize this with a more specic description.
- Review the details of the included tracking items. As you scroll down, you will nd the list of tracking items that make up this Success Plan type as well as detailed descriptions and due dates where appropriate.
- Modify plan details as described in the following section.
- Click the Submit button to save the plan in the student's folder, and trigger the related tracking
items. Note that the individual tracking items will not appear immediately.
The Plan you created will now appear on the student's Plans tab within the Student Folder. From here you can edit or print the plan.
The tracking items that make up the plan are included on the student's Tracking tab. When you click on the menu for the individual tracking item, information about the associated plan is included.
Modify Plan Details
- Reorder items on the plan by clicking the up and down arrows to the left of the item.
- Delete items on the plan by clicking the delete icon (x) to the right of the item.
- Edit items on the plan by clicking the edit icon (pencil) to the right of the item.
When you click the edit button, the details for the item you selected to edit will appear in the top part of the dialog box.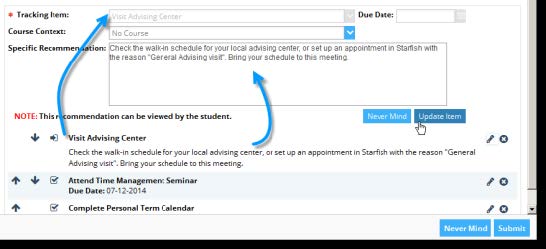
After making any changes to the Due Date, Course Context, or Specic Recommendation fields, click the Update Item button to save changes to that individual item.
Repeat this step for each item on the plan that you want to change. - Add additional tracking items. You may further customize the plan by adding additional
tracking items if needed. Keep in mind that individual tracking items that are not
part of the standard plan may trigger an email notication to the student when you
submit the plan in addition to any plan notication that the student will receive.
To add a new item:
- Select the desired item from the Tracking Item drop down list.
- Select a Course Context if appropriate.
- Provide a Specific Recommendation for this tracking item in the context of the Success Plan for the student(s).
- Click the Add Item button to add this item to the tracking items that make up this Success Plan.
Note: When editing or adding individual items, click the Update Item/Add Item, or Never mind buttons located in the editing panel of the Dialog box to modify the plan details.